


 Hard Drive Recovery
 Deleted Files Recovery
[2023] Quick Solutions for "USB Device Not Recognized" Error

The “USB device not recognized” error is common on Windows computers. If your computer runs on Windows XP/7/8/10/11, you may have come across this error after connecting an external USB device to the PC. If the error occurs, the USB device won’t show up on your Windows PC. This means that you won’t be able to open the device or access data stored in it. In this article, we will focus on showing you how to fix the problem. First, we will learn what’s the causes.
Part 1. Causes of the “USB Device Not Recognized” Issue
-
The USB driver currently loaded on your PC has already become corrupt or unstable.
-
The computer needs an update for issues that may conflict with the external USB device and Windows.
-
The Windows on your computer could be missing important updates.
-
The USB controllers could be corrupt or unstable.
-
The connected external USB device could be entering selective suspend.
-
The USB port could be faulty.

Part 2. How to Fix the “USB Device Not Recognized” Problem on Windows XP/7/8/10/11
There are several things you can do to fix the issue. You can check the video or follow the words below:
1. Remove Power Supply
This is the easiest solution to the issue. It is as simple as unplugging the computer from the power supply. Most modern computers will not turn off completely immediately after being removed from the power supply. To ensure that the computer is turned off completely, you will need to use the Shut Down function in Windows or press the power button before unplugging the PC from the power supply.
2. Uninstall and Then Reconnect Your External USB Device
This solution will work if the USB driver that is currently loaded is corrupt or unstable. To implement this solution, you will need to follow the steps outlined below:
-
Click the start button. In the search box, type in “Device Manager”.
-
From the list of results, select Device Manager.
-
From the hardware list, select Disk Drives.
-
Right-click the external USB drive that has the “USB device not recognized” issue. Select Uninstall.
-
After the drive is uninstalled, unplug the drive’s USB cable.
-
Wait for approximately 60 seconds and then reconnect the drive’s USB cable. Check to see if the USB drive has loaded in the Windows Explorer.
3. Update the USB Device Drivers
To apply this solution to the “USB device not recognized” problem, you will need to follow the steps outlined below:
-
Click Start and type in “Device Manager” in the search box.
-
From the list that appears, select Device Manager.
-
Scroll down to “Universal Serial Bus Controllers” and click on it.
-
Under Universal Serial Bus Controllers, right-click on a USB component you wish to update and then choose “Update driver”.
-
Select “Search automatically for updated driver software”. If Windows currently does not have a new driver, you can try looking for a new one on the device’s manufacturer website. Follow the manufacturer’s instructions to install the updated driver.
4. Fix USB Root Hub
To fix the “USB device not recognized” problem using this solution, follow the steps below:
-
Click the start button and type in Device Manager. Select Device Manager from the list of results.
-
Scroll down to “USB Serial Bus Controllers” and expand it. Right-click on the USB Root Hub and then select Properties.
-
Select the Power Management tab. Uncheck the “Allow the computer to turn off this device to save power” checkbox. If you have more than 1 USB Root Hub listed, repeat the above steps for all the USB Root Hubs.
5. Disable the USB Selective Suspend Setting
This solution will keep the external USB device from powering down. To implement this solution, follow the steps below:
-
Click the Start button and then type “power plan”. From the results, select “Choose a power plan”.
-
Click the “Change Plan Settings” option next to the currently selected plan.
-
Select “Change advanced power settings”.
-
Click the box with the plus sign to expand USB Settings. Again, tap the plus sign to expand “USB selective suspend settings”.
-
Select “Plugged in”. From the drop-down menu, select "Disabled". If you are using a laptop, select “Battery” and then choose disabled from the dropdown menu. Tap “Apply” and then click “OK”.
Part 3. How to Recover Data When You Can't Fix "USB Device Not Recognized" Issue?
When the “USB device not recognized” error occurs, what will worry you the most is losing the data stored in the device completely. What if you tried all methods above, but the problem still exist. Is there a way to get your data on USB drive back? Yes, you do not have to worry about losing your data completely. With a tool known as iMyFone AnyRecover, you can recover your lost data quickly and easily.
AnyRecover works with all storage devices, including mobile phones, hard drives, flash drives, camcorders, Memory Cards, etc. The tool will recover your data irrespective of whether you lost it via damaged hard drive, accidental deletion, virus attack, formatting, OS crash/reinstall, lost partition, etc.
The Main Features That AnyRecover Users Enjoy Include:
- The tool supports over 1000 file formats including photos, music, videos, document, etc.
- It supports all storage devices, not only USB drives, but also hard drives, PC, Mac and all storage cards.
- It makes data recovery both easy and quick, no tech required.
- You can use AnyRecover trial version for free to confirm whether it will be able to solve your problem.
- Support Windows 11/10/8/7 and all macOS versions.
To verify that AnyRecover is extremely easy to use, we have outlined the steps you need to follow for external device recovery below:
Step 1. Launch AnyRecover software. Connect your USB device to computer, then select the device from which you would like to recover your data.

Step 2. After selecting the location, hit “Start” button to start scanning process. You can pause to locate the targeted files or stop it during scanning.
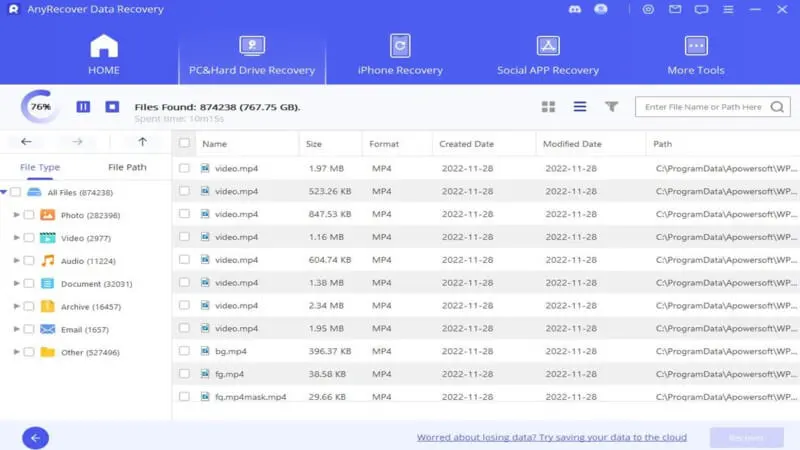
Step 3. After the scan, the lost files should be displayed. Preview the files and select the ones you wish to recover. Click "Recover" to get the files back.

Related Articles:
Rated successfully!
You have already rated this article, please do not repeat scoring!
![]()
![]()
![]()
![]()
![]()
![]()
![]()
![]()
![]()
![]()
![]()
![]()
Copyright © 2023 AnyRecover. All rights reserved.
Time Limited Offer
for All Products
Not valid with other discount *